Introducing a tantalizing Chinese delicacy: boneless spare ribs. Succulent strips of pork marinated in a symphony of flavors, boasting a perfect balance of sweetness and tanginess. Marinate it the night before and you can have a delicious weeknight meal!
Ingredients
1.5 pounds boneless spare ribs
1/3 cup soy sauce
1/3 cup hoisin sauce
1/4 cup dry red wine
1 tablespoon brown sugar
2 garlic cloves crushed
1 tablespoon sambal olek, or chili garlic paste
1/2 teaspoon Chinese five spice powder
1 tablespoon red fermented bean curd, optional for the red color
Method
Cut the spare ribs into 1 inch thick long slices
Marinate the spare ribs with the ingredients and keep in fridge overnight
When ready to cook the pork, preheat the oven to 350°F.
Cover a large baking sheet with aluminum foil and position a baking rack on it.
Arrange the pork slices on the baking rack, keeping any leftover marinade aside.
Bake for 18-20 minutes, basting the pork slices with the reserved marinade 2-3 times during cooking or until pork reaches an internal temperature of 145 degrees F. Cooking times will vary depending on the size of the ribs
For extra crispy edges, broil for 1-2 minutes at the end.
Experience the explosive flavors of our firecracker ground chicken—tender, spicy, and perfectly balanced. With a blend of garlic, hot sauce, tangy vinegar and sweet brown sugar, each bite is a symphony of savory delight.
Servings: 4
Total time: 20 minutes including 5 minutes prep
Ingredients
1 lb ground chicken
1/4 cup hot sauce (I use Naturesta Hot Sauce)
1 tablespoon sesame oil
1/2 teaspoon red chilli pepper flakes
1/2 cup dark brown sugar
2 tablespoon apple cider vinegar
1 tablespoon minced ginger
1 tablespoon minced garlic
1/2 teaspoon black pepper powder
2 green onions finely chopped, green reserved for garnish
Method;
In a frying pan or wok, heat the sesame oil
Add in the chili flakes, let it splutter and then add in the whites of the scallions. Fry for a minute and then add in the ginger and garlic. Fry for another minute
Add in the ground chicken and crumble to cook
While the chicken cooks, whisk the remaining ingredients together in a mixing bowl. Adjust flavor as needed
Once the chicken is fully cooked, add the sauce to the pan and stir until chicken is coated
Remove from flame, and sprinkle the rest of the scallion to serve over hot white rice
On St. Patty’s day, why go with boiled cabbage?Bursting with the freshness of cabbage and an aromatic blend of just a couple of spices, this South Indian delicacy is sure to delight your taste buds and add a nutritious touch to your meal. Join me to explore the simple yet irresistible flavors of this cabbage dish.
Cabbage is highly nutritious, packed with vitamins C and K, as well as fiber and antioxidants, which contribute to overall health and wellbeing. Its low calorie content makes it an excellent addition to weight loss diets, while its natural compounds are believed to have anti-inflammatory and immune-boosting properties. Incorporating cabbage into your meals can support digestion, promote heart health, and contribute to a balanced diet.
Ingredients
4 cups tightly packed shredded cabbage
1 tablespoon coconut oil (alternatively olive, sesame or vegetable oil)
1 small white onion diced fine
2 green chilies – slit in the middle
12 curry leaves (found in Indian or ethnic grocery stores)
3/4 teaspoon mustard seeds
3/4 teaspoon turmeric powder
1/4 teaspoon red chili powder
4 tablespoons grated coconut (fresh or frozen unsweetened coconut)
Salt to taste
1/4 cup water
2 tablespoons finely chopped cilantro
Pan with a tight fitting kid
Method
Heat the oil in a large frying pan. When hot, add in the mustard seeds and curry leaves and let it splutter.
Turn heat to medium and add in the green chilies and onions. Cook till onions are translucent.
Add in the cabbage, give it a good stir. Then add in the turmeric powder, red chilli powder, salt and give it another good stir so the salt, chili, and turmeric mix well into the cabbage
Pour the water over the cabbage and cover with a tight fitted lid. Turn the flam to simmer
After 5-6 minutes, lift the lid and give it a quick stir. Then put back the lid. The water should be slowly drying up. Cook till the cabbage becomes tender. There should be no water left before you proceed to the next step. If the cabbage is still not tender when the water has dried, sprinkle a tablespoon of water over the cabbage
Stir in the shredded coconut and the chopped cilantro and mix well
Your cabbage is now ready
Enjoy it with pulav or as a flavorful side dish with any meal
Roasted cauliflower with harissa is a vibrant Mediterranean dish that combines tender cauliflower florets with the bold flavors of Moroccan harissa sauce. The cauliflower is roasted to perfection, achieving a golden-brown crispness on the edges while maintaining a delightful tenderness within. Harissa, a rich blend of roasted red peppers, garlic, chili peppers, and spices, infuses the dish with a complex and aromatic flavor profile. This culinary fusion not only tantalizes the taste buds but also offers a nutritious dining experience, rich in vitamins, minerals, and antioxidants. Serve as a side dish or a vegetarian main course or in a delicious Mediterranean bowl with falafel, hummus, freekeh and a drizzle of tahini sauce.
I use Naturesta’s Harissa sauce as it is very healthy – no GMO, gluten free, no artificial additives, and no fat.
Ingredients
1 small head cauliflower
2 teaspoons Naturesta Harissa sauce
1/4 teaspoon black pepper powder
2 teaspoons cumin powder
2 tablespoons extra virgin olive oil
Salt to taste
Parsley leaves, finely chopped for garnish
2 tablespoons lemon juice, for garnish
Method:
Turn on the oven to 400 degree farenheit.
Wash and cut the cauliflower head into florets
In a mixing bowl, mix the harissa sauce, pepper powder, cumin powder, oil and salt.
Add in the cauliflower and toss well to coat each piece
Layer a baking sheet with aluminum foil and spread the cauliflower evenly over the foil
Roast cauliflower in the oven for approximately 25-30 minutes or to your desired crispiness.
During December 2023, our three-day stay in Cairo involved indulging in a variety of delightful, traditional Egyptian cuisines. Despite battling jet lag, our perpetual hunger found solace in the delightful breakfast of fava beans, known as Ful Medames, which provided the perfect start to each day.
Ful Medames, also called Foul Medames is a cherished Egyptian breakfast dish, captivates with its simplicity and depth of flavor. Infused with olive oil, garlic, lemon, and a blend of spices like cumin and paprika, the creamy fava beans offer a hearty start to the day, resonating with the rich culinary heritage of Egypt. From the bustling streets of Cairo to tranquil local eateries, Ful Medames embodies more than sustenance—it symbolizes a profound connection to tradition, culture, and the essence of Egyptian cuisine. It can be eaten warm or at room temperature and is often accompanied by bread or other accompaniments like boiled eggs, tomatoes, and tahini sauce.
We enjoyed the dish so much that we had to make it when we got back home.
Ingredients:
If using dried fava beans – 2 cups dried fava beans (ful medames)
If using canned fava beans, 2 cans 14 ounces each fava beans
4 cloves garlic, minced
1 teaspoon ground cumin
1/4 cup extra virgin olive oil
Salt, to taste
1/4 cup lemon juice
Chopped parsley for garnish (about 1/2 cup)
2 large tomatoes chopped for garnish
1 medium red onion chopped, for garnish
1 large jalapeno, cut in thin round slices
1/4 cup radishes chopped, for garnish, optional
Pita bread or flatbread, for serving
Tahini garlic sauce, optional
Instructions:
For dried beans, begin by soaking them overnight in ample cold water, then drain them. Transfer the beans to a large pan and add enough cold water to cover them by approximately 3cm. Cover with a lid, bring to a boil, then reduce the heat and simmer gently until tender, which typically takes at least an hour, depending on the beans’ age. You can also pressure cook it for about 25 minutes. Alternatively, if using canned beans, pour them into a large pan along with roughly half of their liquid (retain the remaining liquid), then heat gently.
Prepare the Seasonings:
In a small skillet, heat the olive oil over medium heat.
Add the minced garlic, ground cumin to the skillet. Cook, stirring constantly, for about 1-2 minutes until the garlic is fragrant and the spice is toasted. Be careful not to burn the garlic.
Mash the Fava Beans:
Once the fava beans are tender, remove the pot from the heat.
Using a potato masher or the back of a spoon, mash the cooked fava beans to your desired consistency. Some prefer them completely mashed, while others like them partially mashed with some whole beans remaining.
Season the Fava Beans:
Stir the prepared garlic and cumin mixture into the mashed fava beans.
Season with salt to taste and squeeze in the juice of one lemon. Mix well to combine all the flavors.
Serve Ful Medames:
Transfer the ful medames to a serving bowl.
Garnish with parsley, tomatoes, and onions, if desired.
Serve ful medames warm or at room temperature with pita bread or flatbread on the side along with a drizzle of tahini garlic sauce.
Turai, also known as ridge gourd or Chinese gourd, is a long, cylindrical vegetable with a green, ridged skin. It is commonly used in Indian and Asian cuisines and has a slightly fibrous texture when cooked. Eating turai is beneficial because it’s a nutrient-rich vegetable, packed with essential vitamins and minerals. It’s low in calories, making it a healthy addition to your diet, especially if you’re watching your weight. The high fiber content aids in digestion and keeps your digestive system healthy. Turai also contains antioxidants that help protect your cells from damage. Additionally, its potassium content supports heart health by helping to regulate blood pressure.
This recipe is from Mrs. Srivastava’s collection of absolutely delicious vegetable dishes. I found this as I was going through my cook book this morning. In 2009, I must have been craving aunty’s cooking and reached out to her daughter who promptly emailed me a few of these. It is a simple recipe but yet so tasty. I have fond memories of eating this as aunty served up hot, fresh chapatis to wolf this down.
Servings: 3
Time: 5 minutes prep plus 10-12 minutes cooking time
Ingredients:
2 long Ridged Gourd (peeled and cut into rounds for about 3 cups)
1 tablespoon oil
1/2 teaspoon mustard seeds
1/2 teaspoon cumin seeds
1/2 teaspoon fenugreek seeds
2 green chilies, diced fine
1 large onion (diced – about 1 cup)
1 teaspoon coriander powder
1/2 teaspoon turmeric powder
Salt, to taste
1 tablespoon chopped fresh cilantro leaves
Method:
Heat oil and add the seasoning of mustard seeds, cumin seeds, fenugreek seeds and green chilies. Let it splutter for about 15 seconds
Turn flame to medium heat and add the onions. Fry till the onions are soft and translucent
Add in the coriander powder, turmeric powder and salt. Stir
Add in the turai, fry for about a minute and then add in 3 tablespoons of water. Cover the pan and cook about 6-8 minutes on low flame until the water evaporates and turai is soft
If we step into Noodles & Company, a local noodle restaurant, we know one kid will always order the spicy Korean noodles. Surprisingly, this dish is so easy to whip up at home.
So spice up your weeknight dinner routine with our mouthwatering Korean Spicy Beef / chicken Noodles recipe! Bursting with bold flavors and ready in no time, this dish is a perfect fusion of fiery spices and savory goodness. Elevate your taste buds with tender slices of marinated beef, tangled with silky noodles, all bathed in a tantalizing spicy sauce. Let’s dive into this Korean-inspired delight
Ingredients
Stir fry sauce
5 cloves of garlic, minced
1/4 cups soy sauce
1 tablespoon fresh ginger, minced
1/4 cup honey
3 tablespoons Gochujang (Korean chili paste)
2 tablespoons rice vinegar
1 tablespoon sesame oil
Marinade for beef or chicken
1 lb flank or sandwich steak or chicken breast sliced thinly
1/4 cup soya sauce
1 tablespoon sesame oil
1/2 teaspoon Sriracha (less if you don’t like it too spicy)
First prepare the meat marinade by mixing the ingredients, pour it over the meat and set aside
Prepare the rice noodles per the instructions on the noodles packet (I usually soak in warm water for 10-15 minutes)
Prepare the sauce for the noodles by mixing all ingredients together
Dice all the vegetables
In a large wok or pan, heat the sesame oil. When hot, add in the vegetables and green onions and stir fry until the vegetables are soft and cooked. Remove the vegetables from the pan and set aside
In the same pan, on high heat, add in the meat along with the marinade and stir fry for a couple of minutes until cooked.
Add the vegetables back to the pan and stir fry for a minute
Add in the noodles and then the stir fry sauce. Cook until the noodles absorb all the sauce
Sprinkle the sesame seeds and basil, remove from the flame and serve hot!
Pearled couscous, also known as maftoul, is round and made from whole wheat flour and bulgur flour, giving it a delicious, nutty flavor. It cooks up to a wonderful, chewy consistency within minutes. It is great as a bed for grilled fish, chicken, or as a side dish.
Servings: 2
Ingredients
2 tablespoons olive oil
1 small dried bay leaf
1 teaspoon garlic, minced
1 small white onion, diced fine
1/4 raisins, optional
1.5 cups Pearled couscous
1 and 3/4 cup chicken or vegetable broth
1/4 teaspoon cinnamon powder
1/2 teaspoon salt
1/4 teaspoon black pepper powder
Zest of half a lemon
1/4 cup fresh parsley, minced
Method:
In a large saucepan, on medium heat, heat the olive oil.
Add in the bay leaf, let it splutter and then add the garlic and onions. Saute until translucent
Add in the raises instead and stir for about 30 seconds
Add couscous and stir often until couscous browns slightly
Add broth, cinnamon powder, salt, and pepper. Bring to a boil
Reduce heat to low, cover and simmer until liquid is absorbed and couscous is tender
Remove from heat and stir in parsley and lemon zest
Parathas are griddle fried, Indian flatbreads. These unleavened breads are easy to make and are a favorite in our home. Made with whole wheat, water, and ghee/olive oil for a vegan alternative, it’s a healthy and delicious alternative to store bought flour tortillas or rotis.
When we got married, Nilesh remembers waking up every morning where the aroma of ghee beckoned him to the kitchen. There the cook barely kept up rolling out parathas as Nilesh would wolf them down as soon as they came off the tava/pan.
Today, the kids and Nilesh relish it anytime of the day – with scrambled eggs for breakfast, rolled up with jam and cheese as a snacks, or for lunch and dinner accompanied with curries.
Making them doesn’t really take much time. And they are so delicious, shape doesn’t really matter. You will need a rolling pin, a pan or griddle to cook it on, whole wheat dough, a dash of salt, olive oil or ghee and you are ready to go.
Warm water: use lukewarm water to knead the dough. Add water in batches. Knead gently. Dough should not be too soft or too firm.
Ghee or olive oil: a tablespoon of warm ghee or olive oil added while kneading not only gives it a different aroma, but will make it softer.
Cover the dough and let it rest: after kneading the dough, cover it with a damp cloth and let it rest for 10-30 minutes. Not only will it keep the moisture in, it allows the dough to rise slightly the dough should be semi soft
Add milk or yogurt: adding room-temperature yogurt or warm milk while kneading, enhances the texture and makes and keeps the parathas soft
Rolling the parathas: parathas should be rolled slightly thicker than chapatis
Stove temperature: don’t cook them on too low or too high a flame. Cook on medium flame and add ghee when you see brown spots on the paratha and lower the flame to complete cooking. Move the paratha around on the tava and keep applying a little pressure with the back of a spoon or spatula to cook evenly.
Pronounced pa-ra-thas, these delicious, healthy, flaky, unleavened Indian flatbreads, are made with whole wheat flour. These are best enjoyed warm with curries, lentils or vegetable dishes. They are also a good alternative for tortillas and wraps.
The word paratha is the combination of the words ‘Parat’ meaning layers and ‘Atta’ meaning dough. It translates to layers of dough that are cooked.
When making parathas, the dough in layered onto itself before it’s rolled into a triangle on a lightly floured surface. The rolled dough is then cooked in a hot tava (griddle) while brushing ghee or alternatively, olive oil, toasting until both sides have golden brown spots and crispy. The longer you cook, the crispier they get. Follow these tips to make perfectly soft parathas each time.
These parathas are great for curries, rolled up with jam or jam and cheese, or chutneys. In our home, they are a welcome alternative to bread for breakfast.
Servings: 8 parathas
Time: 40 minutes including resting time
Equipment: large mixing bowl, rolling pin (and surface to roll it on), tongs/flipping spatula, tava or griddle
Ingredients:
2 cups whole wheat flour (atta…available in Indian stores)
1 to 1.25 cup of water (as needed)
5 tablespoons ghee or oil (to add to the dough as well as during roasting)
3/4 cup dry flour for dusting during rolling
1/4 teaspoon salt
Instructions
Add 2 cups of dough, 2 teaspoons of the ghee/oil and salt to the mixing bowl
Slowly add water in batches, while kneading the dough in either a dough mixer or by hand to make a firm dough. I usually use a 2:1 ratio or flour to water
If the dough is too difficult to knead then add drops of water at a time, until it is soft and pliable
Cover with a damp cloth and set aside for atleast 20 minutes
Now divide the dough into 8 equal parts and roll each part into a ball. Keep the balls covered with the damp cloth as you roll each one out
Lightly flour the rolling area and place a ball of dough on it. Roll the dough into a circular shape with the help of the rolling pin
Smear a little ghee on the paratha evenly with the back of a teaspoon. Then fold into half. Now smear the semi-circle with a little ghee again, then fold into half, forming a triangle. Lightly sprinkle flour on both sides
Sprinkle flour on the rolling surface and lightly roll out the folded paratha. Don’t make it too thin. While rolling this, heat the griddle on a medium flame. I usually roll 3-4 parathas while the griddle heats up, keeping the rolled parathas aside, ready to cook
When the griddle is hot, place a paratha on it. Soon it will start to puff. Manage the heat, too hot and it will burn, too low a flame and the paratha will be too hard
When the paratha puffs, flip it over. On the slightly cooked side, smear ghee with a teaspoon, spreading it evenly. Gently press the paratha with a spatula enabling it to cook evenly. You will see brown spots as it cooks Flip the paratha and add ghee to the other side. You will see it puff and the layers separate. You will continue to see brown spots. Flip as needed, cooking while more brown spots form
Remove from heat and stack in a closed container so parathas remain soft and warm
Repeat the process to cook the rest of the flatbreads
Eat warm with curries, lentils or sauteed vegetables. Roll it with jam or chutneys. If stored, warm on the pan later. If you warm in a microwave, cover with a damp paper towel to maintain softness
Steps in pictures
Knead the dough and let it rest while covered with a damp cloth. Then divide into 8 equal portions and roll each portion into a ball.Take one of the eight dough balls and roll into a circleAdd flour to the rolling surface so the paratha doesn’t stick to the surface.Smear the semi circle with ghee and fold again to form the triangle. Dust lightly with flour on both sides Roll the triangle out gently ….make sure it’s not too thinSmear with ghee and fold into halfCook on medium flame, smearing with ghee and flipping until the layers separate and brown spots form on both sides
Delicious, succulent meatballs that are smothered with a sauce that is sweet and tangy make for a side dish, appetizer or main dish. Serve with a side of vegetable fried rice and transport yourself to the Hawaiian islands.
Time: under 15 minutes
Servings: 4
Ingredients
1.5 lbs cooked Meatballs
1 cup pineapple chunks or 1 can pineapple chunks drained1 cup barbeque sauce
1/8 cup rice wine vinegar
1/8 cup soy sauce
1/8 cup brown sugar
1 teaspoon sriracha sauce (optional)
2 large cloves garlic minced
1 tablespoon ginger minced
1 small onion diced fine
1/2 cup sweet red peppers chopped
1 stem green onion chopped for garnish
1 tablespoon sesame or olive oil
Method
In a small bowl, whisk the bbq sauce, vinegar, soya sauce, brown sugar, and sriracha sauce
Heat oil in a frying pan. When hot, add the onions, ginger, and garlic. Stir fry for a minute until the onions are translucent
Add in the meatballs and the peppers and stir for a minute
Pour the sauce and continue to stir fry until the meatballs are well coated with the sauce.
Add in the pineapple. Turn the heat to simmer and cook for another two minutes
Turn off the stove and sprinkle the spring onions over the meatballs
Serve with a side of vegetabke fried rice or plain rice and a side of vegetables
These fish tacos are the best. Easy to make, fresh, and flavorful with smoky, spicy white fish, crunchy cabbage, pineapple salsa, and the best creamy fish taco sauce! It takes less than 30 minutes to make, so it’s perfect for a weeknight or a make ahead meal.
When you are looking for make-ahead meals, this recipe is easy to prep and keep in the fridge. Fry or bake the fish right before meal time and you will have hot, delicious fish tacos on the table in no time. Wrap it into a delicious burrito for a meal at work or school or make it into a healthy fish taco bowl. Either way, the smoky, zesty favors of adobo shine through and this will be a sought after recipe for Taco night, Lenten fish Fridays or just about anytime. Best of all, it’s a good dose of healthy – the red cabbage slaw provides your daily serving of vitamin C and vitamin K while the fish adds a boost of protein and omegas.
While it looks complicated, there are three easy steps to making the fish tacos: prepare the fish, whip up the sauce, and prep the taco toppings. Serve and enjoy!!
Servings: 4-6
Ingredientsfor the Adobo fish
1 pound fish (Cod, halibut or tilapia) cut into small cubes
2 chipotle chilis in adobo mashed up and 2 teaspoons of adobo sauce
1 teaspoon cumin powder
1 teaspoon garlic powder or minced fresh garlic
1/2 teaspoon kosher salt
Juice from 1 large lime
3/4 teaspoon turmeric powder (optional)
2 tablespoons olive oil
1 cup flour
8 corn tortillas
Ingredients for the coleslaw
1/2 medium head of red cabbage, shredded or finely sliced
1/4 cup apple cider vinegar (or red wine vinegar or white vinegar)
1.5 teaspoon granulated sugar
1 teaspoon kosher salt
Ingredients for theadobo crema sauce
3/4 cup mayonnaise
2 chipotle chilis in adobo sauce
Juice of 1 lime
1teaspoon honey
Ingredients for pineapple salsa
2 cups fresh pineapple diced
4 small Roma tomatoes diced
1-2 red or green jalapenos, finely diced (dressed for less heat)
1/2 cup red onion, finely diced
2 cloves garlic finely diced
1/4 cup chopped cilantro
Juice from 1/2 large lime
1/2 teaspoon kosher salt
Optional topping: Poblano peppers sliced and grilled or pan fried
Method:
For the fish:
Place the chopped chipotle chilies in a small bowl, add the adobo sauce, cumin powder, garlic, turmeric, salt, lime juice, and stir to form a paste. Place the fish in the bowl and rub it to cover all pieces with the marinade. Keep in a Ziploc bag in the fridge. When ready to fry, heat oil in a frying pan. Place the flour on the plate and lightly coat each fish piece on all sides with the flour before frying. Turn on all sides until cooked.
For the coleslaw:
Mix all ingredients in a bowl and set aside for at least 15 minutes for the flavors to set in
For the adobo cream sauce:
Mix all the ingredients in a bowl and keep aside. Drizzle lightly over the fish when serving.
For the pineapple salsa
Mix all the ingredients in a bowl and keep aside for at least 15 minutes to let the flavors mix in.
To serve:
Heat the corn tortillas on a large dry skillet or griddle over medium/high heat.
To assemble:
Layer the tortilla with pieces of fish, the cabbage slow, the pineapple salsa, and drizzle with that awesome taco sauce! Serve with a fresh lime wedge to squeeze over tacos.
Alternatively, serve as a bowl on a bed of lettuce and cabbage slaw
Daikon also known as the Japanese radish, is a root vegetable. Grown throughout East and South Asian countries, it’s nutritious, crunchy, refreshing and can take on different flavors depending on how it’s cooked. Daikon are less spicy than their commonly consumed cousin, the red radish.
It is a superstar vegetable with it being a low-calorie food filled with high water content and packed with vitamins and nutrients, including vitamin C, calcium, folate, and potassium. Besides containing fiber and enzymes that aid digestion, it is also known to heal wounds quickly.
This perfect blend of daikon, carrots and shrimp come together for an easy, quick weeknight meal filled with sweet, tangy, and fiery flavors.
Serving: 3 as a side
Time: 15 minutes including prep time
Ingredients:
2 cups diced (small cubes) daikon
1 lb deveined, cleaned uncooked shrimp, washed and seasoned with a dash of salt and pepper
1 tablespoon apple cider vinegar
1 yellow onion diced fine
2 scallions/ green onions chopped fine
1/2 cup carrot, chopped into small rounds or cubes
2 tablespoons gluten-free tamari or soya sauce
2 tablespoons gochujang paste
1 teaspoon sugar
1 tablespoon oil
Method
In a wok or frying pan, heat the oil. When hot, add the onions and the whites of the scallions. Stir fry for a minute until onions are translucent.
Add the daikon and carrots to the pan, stir frying at high flame for 3 minutes making sure it doesn’t burn. Cook a minute or two longer, if you like your vegetables softer in texture.
Add in the soya sauce/ tamari, apple cider vinegar, sugar, and gochujang paste and stir fry for another minute.
Add in the shrimp and stir fry for another 1-2 minutes until the shrimp is cooked.
Remove from flame and garnish with the left over scallion greens.
Hands down the juiciest turkey meatballs you can make. The secret to the moistness in these meatballs is a combination of yogurt, zucchini and bread. Try these, and you will think twice before buying store bought meatballs again. And it’s also a great way to sneak some veggies in!
Our family loves meatballs….in pasta, curry, Mediterranean bowls, a sub, or on its own, the possibilities are endless. It’s easy to make meatballs at home and freeze them. Turkey meatballs can be still juicy and delicious and most of all, lean and healthier than beef meatballs.
Prep time: 10 minutes. Cook time: 30 minutes
Servings: for 4 – 6;people
Ingredients
1.25 lbs 93% lean ground turkey
4 cloves garlic finely minced
1 small red onion finely diced
2 cups baby spinach (chopped)
1 tsp dried chili flakes (optional if you like it spicy)
1 cup grated zucchini, liquid squeezed out well
2 slices whole wheat bread, or gluten-free bread
1/4 cup Greek yogurt
1/4 cup seasoned whole wheat breadcrumbs, or gluten-free panko
1 large egg
1 tbsp fried oregano, chopped
1/4 cup fresh parsley, chopped
2 tbsp chopped fresh mint, chopped
1 tsp kosher salt and fresh black pepper
Olive oil cooking spray
Method:
Preheat oven to 400 degree Fahrenheit.
Spray olive oil on a sheet pan and set aside.
Put the slices of bread in a bowl and cover the slices with water. Allow it to soak for about 1 minute. Discard the water and squeeze the water out from the bread. Crumble it a bit with your hands and add it to a mixing bowl.
To the same mixing bowl, add in the rest of the ingredients seasoning with salt and pepper.
Form balls (golf sized) with that mixture and arrange them on a sheet pan.
Bake in the heated oven for 30 minutes or until meatballs are fully cooked.
Then transfer to the top rack and turn on the broiler for 1-2 minutes or until the tops are boiled.
Alternatively, in a skillet, add in a tablespoon of olive oil and heat on medium flame. When the oil is hot, add the meatballs and cook over low heat, until cooked through, turning halfway, for about 10-12 minutes or until cooked thoroughly.
Serve them in a Mediterranean bowl with greens, feta, olives, couscous, and all the sauces you like. Alternatively, they taste great in pasta.
Sweet, sour, spicy come together for a delicious flavor profile in this Korean Ground Turkey recipe. This dish has become a comfort food for the kids. Combine it with a bowl of steaming Jasmine rice, a side of broccoli, carrot sticks and edamame beans and viola, a perfectly healthy, flavorful meal at your fingertips.
This is a perfect weeknight dinner as it is ready under 15 minutes. This recipe is often made with beef but I substitute turkey or chicken for a lean option.
Ingredients:
1 pound lean ground turkey or any lean ground meat
1/4 cup soya sauce
1/4 cup brown sugar
2 tbsp siracha sauce (or to taste)
1/2 tsp dry red chili flakes
3 large cloves of garlic, chopped fine
1 tbsp ginger, chopped fine
2 tbsp sesame oil
1 tsp roasted white sesame seeds for garnish
1/4 cup finely sliced green onions for garnish
Method
1. In a frying pan, heat the oil. When hot, add in the red chili flakes, ginger and garlic. Stir fry on medium heat for a minute
2. Add in the ground meat, frying it well, breaking the meat into crumbles over medium heat, until it is no longer pink
3. Add in the soya sauce, brown sugar and Sriracha, mixing it well, until it is well combined. Let it simmer for 2 minutes
4. Serve on a bed of hot rice, garnished with the sesame seeds and green onions. Add a side of vegetables like sweet pepper strips, cucumber slices, steamed edamame beans, broccoli, green beans or carrot sticks
This past summer, we stopped by Abu Dhabi enroute to India. It was a few days of beautiful sights and the most delicious middle eastern food. The Za’atar on tender bread reminded Nilesh of his days growing up in the middle east. He couldn’t stop talking about those flavors even after a month so this afternoon, we stopped by a Lebanese grocery store, picked up some Za’atar spice and gyros bread and used our home grown tomatoes to make some scrumptious Middle Eastern flatbread.
What’s Za’atar? It’s a herb and spice mix that tastes a bit nutty, savory and crunchy. The herb, originally is a herb called hyssop, although in the US, oregano or thyme replace it. The spices are a combination of sumac, coriander seeds and sesame seeds.
Benefits of Za’atar: In some parts of the middle east, there is a belief that Za’atar makes the mind alert and is also used to prevent or eliminate internal parasites. It’s also known to sooth inflammation, boost skin health and build strong bones. No wonder, Lebanese kids are encouraged to have it for breakfast. You can drizzle it over vegetables, avocado on toast, or mix it up with olive oil for use on a pizza/flatbread.
Cook time: 10 mins. Prep time: 5 mins
Servings: 2
For the pizza
2 pitas or naans
1 large tomato cut into half and then sliced
1 tablespoon olive oil
1 tablespoon Za’atar spice mix
Tahini Sauce for drizzle
1/2 cup Tahini (sesame paste)
1/4 cup Greek yogurt
1 tablespoon lemon juice
1 clove garlic, minced
1/4 tsp salt
8 tablespoons cold water
Method for Tahini sauce:
Blend all ingredients together to form sauce. Add extra water for desired consistency.
Method for pizza: (Oven/ Foodi/ Air fryer options)
Preheat Foodi or Air Fryer with air fryer option to 375 degree Farenheit or Oven to 400 degrees
Mix Za’atar and olive oil and brush the mix on the pita
Why get take out when you can quickly dish up a quintessential Chinese takeout dish in minutes? This one-pan, 30-minutes dish is loaded with tender broccoli and nutrition-packed beef cooked in a delicious sauce. Serve over rice for a delicious meal!
Broccoli Beef originates from a Chinese dish called Gai Lan Chao Niu Rounor or Chinese Broccoli Fried Beef. However, early immigrants could not find Gai Lan in the US, and American broccoli became an easy substitute, right around when broccoli was getting more popular in the US too. Given the ability of the broccoli to absorb delicious flavors of the sauce and the tender slices of beef, it’s no wonder it makes its way onto every Chinese restaurant menu.
Servings: 4
Time: 30 minutes
Ingredients:
3 Tablespoons cornstarch, divided
1 teaspoon baking soda or tenderize the meat by hammering it with a meat mallet)
1 pound flank steak, cut into 1-inch pieces. (Find the grains of the beef and cut against it. After cutting rinse off the blood and set aside)
1 small onion, diced
1 tablespoon garlic, minced
1 tablespoon ginger, minced
1 tablespoon oyster sauce
1/4 teaspoon pepper powder
1/2 cup low sodium soy sauce
3 Tablespoons packed light brown sugar
2 Tablespoons sesame or vegetable oil, divided
4 cups small broccoli florets
1/4 cup carrot, cut into matchsticks (optional)
Method
In a large bowl, mix 2 tablespoons of the cornstarch with water to form a slurry. Add beef to the bowl and toss until the beef is well coated with the cornstarch mix.
In a separate bowl, mix together the remaining 1 tablespoon of cornstarch along with soya sauce, oyster sauce, pepper and brown sugar. Set aside.
Heat 1 tablespoon of oil in a large pan or wok on medium flame. When hot, add the beef and fry the beef on one side for 30-60 seconds. Flip and fry the beef until it is cooked through another 60 seconds. Transfer the beef to a plate and set aside.
Add remaining oil to the pan and when hot, add the diced onions, garlic and ginger and cook for a minute and then add the broccoli florets and carrots. Cook until broccoli is tender, about 4 minutes.
Add the beef back to the pan and pour the sauce over. Stir for another minute until the sauce thickens.
Turn off the stove and serve with a side of rice or noodles.
A healthy dish that comes together in a flash for a weeknight dinner but with its restaurant- quality look and flavors it’s perfect for when guests stop by. The tart, briny and lemony flavors will have you licking the plate clean. You may want to double up the servings as you will be craving this again the next day!
In a plate, mix together the flour, black pepper powder, Italian seasoning. Coat chicken with the flour mixture, and shake off excess.
In a skillet, heat oil, on medium flame. When hot, add garlic, and cook garlic for 30 seconds.
Add the chicken to the pan and cook. After 5 minutes, turn chicken over, and continue cooking until brown on both sides and cooked through for another 5 minutes. Should take about 10 minutes to cook on both sides. Remove from skillet and set aside
Add the chicken broth to the skillet and bring to a boil. Add in the water and the cornstarch slurry (cornstarch water mix). Continue cooking for about 2-3 minutes until the sauce is thickened. Add chicken back to the skillet, cover and simmer for about 2 minutes. Remove the lid and stir in lemon juice, capers and parsley. Turn off the stove. Divide amongst four plates, spooning the sauce over the chicken.
Serve chicken in lemon-caper sauce with a side of beans and mashed potatoes! Yum!!
Kheema is a staple Indian dish and just so versatile. Nilesh, as a bachelor, made a huge pot of kheema and had it with pasta, with chapatis, or rice..he almost always seemed to be having kheema for a meal. Now we also use it in patties, empanadas, shepherd’s pie, and potato chops. Make a large pot and then package it into ziplock bags, frozen for another day and another dish!
This is my mum’s recipe. The secret ingredient which made her dish stand out was the addition of vinegar and sugar! You won’t be disappointed.
Servings:6
Ingredients:
1 lb ground turkey (or other meat – cooking time for non turkey options will vary )
3 tbsp oil
2 large onions
2 tbsp ginger, minced fine
2 tbsp garlic, minced fine
2 heaped tsp coriander powder
1 tsp black pepper powder
1 heaped tsp garam masala powder
1 tsp chili powder
2 tsp cinnamon powder
3 tbsp apple cider vinegar
2 tsp sugar
2 tbsp kasuri methi (optional)
1/2 cup chopped fresh cilantro
Method:
Heat oil in a large pan
When oil simmers, add in the chopped onion, garlic and ginger
Turn the flame to low and stirring occasionally, let the mix cook 3 minutes until onions are translucent and soft
Add spices (except vinegar, salt and sugar) and fry for 1 minute on low flame
Add the meat, fry for 5 minutes
Add the vinegar, salt, sugar
Cook for 15 mins on low flame
Sprinkle in kasuri methi and cilantro, stir and cook for another minute
Serve hot with chapatis. Use leftovers to make shepherd’s pie or potato chops
This nutritional lentil dish packs an additional punch thanks to the addition of spinach. It’s vegetarian, gluten free and low fat giving you all the benefits of lentils (good protein, digestive health, weight loss etc.) and spinach (weight loss, eye health, anticancer and immunity boosting). Have it as a soup, over rice or scoop it up with a chapati.
Servings: 4. Time: 20 minutes
Ingredients:
1 cup toor dal (split pigeon peas or yellow lentils)
1 tablespoon ghee (or olive oil)
1 teaspoon mustard seeds
1 teaspoon cumin seeds
5 garlic cloves minced fine
1 tablespoon ginger, diced fined
1 large tomato, chopped
2 cups baby spinach
Juice of 1 large lime
1/2 teaspoon turmeric powder
1/2 teaspoon red chilli powder
Salt to taste
2 cups water
Method:
Start the instant pot or pressure cooker or ninja foodi in Saute mode
Heat the oil/ghee
Add in the mustard seeds, cumin seeds and let them splutter for 10 seconds
Add garlic, let it splutter for 10 seconds
Add chopped tomatoes, spices and fry for 30 seconds
Add in the lentils, stir and add in water
Close lid of cooker and change mode to pressure cook
Pressure cook for 15 minutes
Let the pressure release naturally
Open the lid and add in the spinach and lime juice. Stir well and let us rest for 3-4 minutes, covered. The spinach will melt
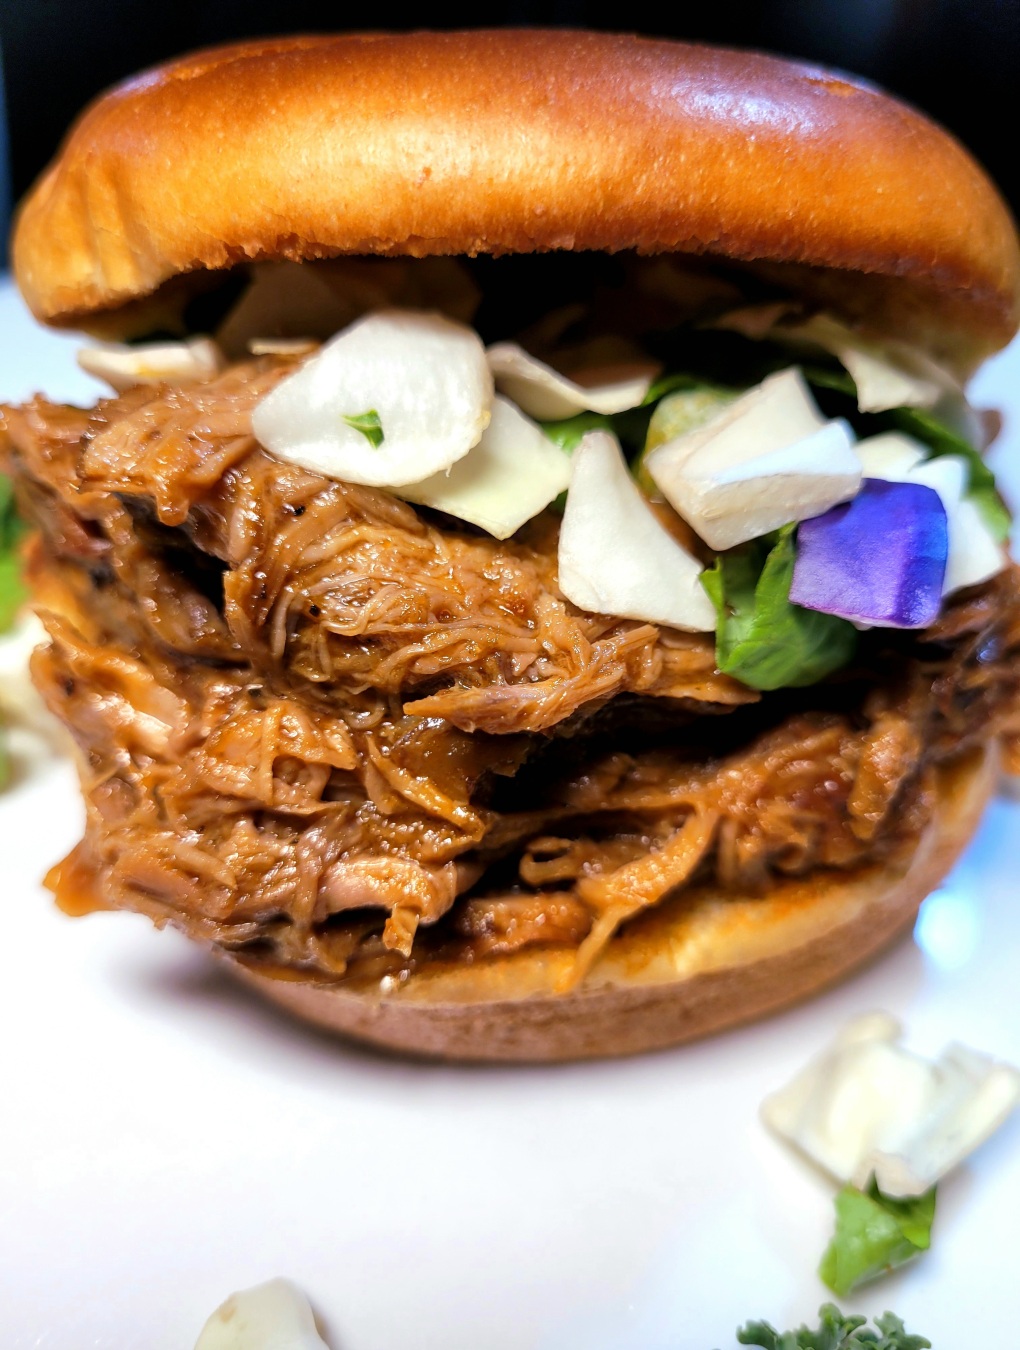
Pulled pork simmered in a tangy, sweet and spicy sauce bringing back memories of a roadtrip down to Texas where we had the most delicious and moist pulled pork – in the parking lot of a restaurant because of Covid. As we reminisced over the trip, we had to replicate the flavors at home.
Servings: 8 (for 8 sandwiches)
Prep time: 10 minutes. Cook time: 6 hours
Ingredients
1 teaspoon oil
1.5 large onions, chopped
3 large garlic cloves, minced
4 lbs pork shoulder butt roast
1/2 cup apple cider vinegar
1 tablespoon Worcestershire sauce
1 tablespoon prepared yellow mustard
1 tablespoon red chilli powder
1 teaspoon pepper powder
2 teaspoons salt
1/4 dark brown sugar
1/2 cup chicken broth
1/2 cup ketchup
1/2 cup barbecue sauce (see notes to make barbecue sauce at home)
Method
Lightly rub the pork with salt and pepper
If using a Ninja Foodi, put on the sear option on high
Pour the oil into the bottom of a slow cooker, dutch oven or the Ninja Foodi
Add the onions, garlic
Add the remaining ingredients including the pork
Cover the container to cook:
Turn on the slow cooker and set for high
For Foodi, switch to slow cooker option and set to high
For oven, preheat to 250F. Cover dutch oven and place in oven
Cook on high for 5-6 hours until the pork shreds easily with a fork
Remove the pork from the slow cooker and shred the meat using two forks
Return the shredded meat to the slow cooker, and stir the meat with the juices in the pot
Serve on hamburger buns with a side of beans, coleslaw and potato salad
Notes:
Home made barbeque sauce:
Ingredients:
1.5 cups ketchup
2 tablespoon molasses
3 garlic cloves minced
1/4 cup dark brown sugar
1/4 cup apple cider vinegar
1 tablespoon red chilli powder
1 teaspoon black pepper powder
1 teaspoon prepared mustard
Method
Combine ingredients in a pot on the stove. Simmer for 15- 20 minutes until sauce has deepened in color. Store in a tightly covered lid for upto 10 days
When you want a healthy and yet quick meal or a snack on-the-go, these quesadillas are a great option. A mix of spinach, corn, mushrooms, black beans, onions, and creamy avocado makes for a filling, delicious vegetarian meal. And if you’re craving meat, just add some shredded chicken to the mix.
Servings: 4 quesadillas Cook and prep time: 20 minutes
Ingredients:
1 tbsp Olive Oil
3 cloves Garlic, minced
1 large Red Onion, diced
1/2 tsp Red Pepper flakes
8 oz Baby Bella mushrooms, thinly sliced
3 cups fresh Spinach
1/2 cup frozen Corn
1/2 cup cooked Black Beans
2 large Avocados, removed from shell and thinly sliced
2 cups shredded cheddar or mozzarella cheese
4 medium Tortillas (I use whole wheat although flour tortillas are usually tastier but less healthy)
Salt to taste
Salsa, for serving
2 cups shredded chicken, optional (for when you want a non-vegetarian option)
Method:
In a pan, heat the Olive oil
When oil is hot and shimmering, add in the garlic and red pepper flakes. Stir and add in the onions, stir occasionally while the onions turn translucent.
Add in the sliced mushrooms. Fry the mix, stirring occasionally, until the mushrooms are tender and caramelized, and the water from the mushrooms in the pan has dissipated – approximately 3-4 minutes
Add in the spinach, black beans and corn. Cook till spinach has wilted. Sprinkle salt, stir and keep aside
Lay out the four tortillas on plates
Cover a half of each tortilla by distributing the 1 cup of cheese across the tortillas
Distribute equally the spinach, corn, black beans, and mushroom mix over the cheese
Layer the mix with equal amounts of avocado slices and sprinkle the remaining cup of cheese evenly over it, as well
Fold tortilla into half by pressing the empty half of the tortilla over the toppings
Heat a medium/large size skillet. When skillet is hot, place the folded tortilla in the skillet. Cook on both sides for a total of 4 mins, flipping half-way through
Before serving, cut the quesadillas into 3 equal sizes
This aromatic, sweet and tangy sauce complements salmon. Not only is it a healthy, quick and easy dinner option, it is an elegant meal for when you have company.
Serves:4
Ingredients
1 lb skin-on, boneless salmon filet
8oz baby bella mushrooms, diced into small pieces
1 large red pepper, diced into small pieces
1/4 large red pepper, cut into thin red strips
2 stems green onions, diced fine
1 tbsp ginger, diced fine
1 tbsp garlic, diced fine
2 tbsp size chunks of seedless tamarind (see method below)
1 tbsp fish sauce
1 tbsp soya sauce
2 tbsp sugar
2 tbsp vegetable oil
1/4 fresh coriander leaves, chopped
For the fish before grilling or pan frying
1/2 tsp salt
1/2 tsp pepper powder
1 tbsp vegetable oil (2 tbsp if frying)
Method
To make tamarind, soya and fish sauce mix:
Take a large marble sized piece of seedless tamarind
Put tamarind into a microwave safe bowl and add in 1/4 cup warm water. Heat for a minute in the microwave. Rest for 2 minutes. Then mash the pulp with the back of a spoon, forcing it through a strainer . Scrape off the paste that is on the underside of the strainer. Discard the solids left in the strainer
To the tamarind mix in the bowl, add fish sauce, soya sauce, sugar and blend well till sugar dissolves
For the mushroom – red pepper sauce
Dice mushrooms and red pepper into small pieces
In a wok, heat oil
When hot, add in the garlic, stir fry for 30 seconds and add in the ginger
Stir fry for 30 seconds
Add in the mushrooms and stir fry for 3-4 minutes until the water from the mushrooms dry out
Add in the tamarind, fish sauce mix and stir fry for 1 minute
Add in the green onions, and diced red pepper and stir fry for another minute
Remove from heat and set aside
Fish
To cook in Ninja Foodi:
Place water into Ninja Foodi pot. Season salmon with salt and pepper on both sides, no oil, on rack, making sure the rack is in the higher position.
Assemble pressure lead, making sure the pressure release valve is in the SEAL position
Select PRESSURE and set to HIGH. Set time to 2 minutes. Select START/STOP to begin
When pressure cooking is complete, quick release the pressure by moving the pressure cooker valve to the VENT position. Carefully remove lid when pressure is released
Gently pat salmon dry with paper towel, then close with crisping lid
Select BROIL and set time to 7 minutes. Select START/STOP to begin, check for doneness after 5 minutes
To grill on a regular grill:
While the sauce is cooking, marinate the fish with oil, salt and pepper. Rub mixture on both sides of fish. Heat grill to 450 degree F. When hot, grill the salmon skin side down over direct heat with the lid closed, for about 4-5 minutes and then turn the salmon over, close the lid and another 4-5 minutes
To pan fry:
Rub salt on both sides of the fish. Heat oil in a pan. When hot, add fish, skin side down and fry for about 4 minutes on each side
Serving
Serve fish while hot, with the Mushroom-Red Pepper sauce spooned over it, garnished with red pepper slivers and cilantro. It can be accompanied by vegetables like bok choi or broccoli as well as steamed rice
This mild, yet complex Thai curry impresses with its pleasant and interesting flavors.
When we have guests, Thai or Mexican dishes are usually our go-to. Quick, flavorful, and enjoyed by most, it’s definitely faster to pull together than Indian food. When we do make Thai dishes, curries take center-stage and this yellow curry, is a mildly spicy delicious alternative to the ubiquitous red curry.
This curry can be made in advance, I prefer to, as I find it tastes even better. It has lots of sauce and can be re-heated very easily.
Servings: 4
Ingredients
10 oz boneless, skinless chicken breast (optional if vegan, see note)
3 tbsp fish sauce (alternatively, 3 tbsp lime juice if vegan)
1 tsp sugar
1 can bamboo shoots
1 medium sized Chinese eggplant, cut into thin long slices
3 tbsp green peas
1/2 medium red pepper, cut into thin strips
1 large red potato (or white) cut into small cubes
1 small yellow onion, diced fine
1/4 cup cilantro, chopped roughly
1/4 red pepper strips, cut into thin strips for garnish
1 tsp vegetable oil
Method
Slice chicken breast into thin, long slices ( 3 inch long, 1 inch wide and 1/4 inch thick)
Heat oil in a large frying pan or wok
Add in the onion, and stir fry for 2 minutes
Reduce heat to medium. Add in the yellow curry paste and stir fry for 1 minute
Add in the potato cubes and stir fry on low flame for 2 minutes
Add in half the can of the coconut milk, stir to dissolve the paste in the coconut milk and bring to a boil
Add the remaining cup of coconut milk, raise the heat to medium and let it cook for 10 minutes. You will start to see the oil from the coconut milk raise to the top
Tear the lime leaves to halves and add to the sauce. Cook for another 2 minutes, the sauce will thicken
Add chicken and egg plant into the sauce, turn heat to maximum, cook for a minute
Add 1/2 cup water and let the curry boil for a minute
Add fish sauce and sugar and turn heat to medium. Stir for 2 minutes
Add in bamboo shoots, red pepper strips and cook for 2 minutes
Add in the peas and 3/4 of the chopped cilantro
Stir fry for 2 minutes
Serve hot, topped with remaining cilantro leaves and a few red pepper strips with a side of rice
Made from scratch, this recipe beats canned curry pastes. When time is not of the essence, prepare this paste and then make a delicious Thai curry. Serve it over rice and then enjoy the afternoon siesta!
To soak or not to soak? The kids want to take burritos to school and I don’t have time to soak beans. Sure I can make it without beans but beans add a lot more protein and nutrition. What to do? A no-soak option gives me delicious, smoky beans within an hour.
The options below include the method if you did soak your beans overnight.
Ingredients
1 cup dry black beans
1 tsp garlic powder or 1 tbsp finely chopped garlic
2 tsp lime juice
2 tsp crushed chipotle pepper with sauce
1 tsp cumin powder
Salt, to taste
1/4 cup cilantro, for garnish
Optional garnish: red onions, avocado
Method
Wash the beans and remove any debris
Put beans and 2 cups water in a pressure cooker-safe container and pressure cook on high for 30 mins and slow release for 15 minutes
If you did soak your beans for atleast 6 hours, pressure cook beans for 15 minutes
How do I get easy, and healthy meals on the table on a weeknight? Mexican, Thai, Chinese are usually my go to dishes. This Mexican Chicken casserole dish is a multi-purpose one. I either roast a chicken on the weekend or buy one from Costco. Make this dish using rotisserie chicken and you can have dinner on the table in under 30 minutes. And best part, use the left overs for burritos and quesadillas in the lunch box the next day!!
Servings: 4
Time including prep time: 25 minutes
Ingredients
1 yellow onion
1 tsp vegetable oil
1 tbsp garlic, finely minced
4 Cups chicken, cooked and shredded
1 cup green peppers, diced
1/2 cup red peppers, diced
1 cup black beans (can or soak overnight and cook first)
1 cup corn
2.5 cups salsa (medium or spicy)
1 tsp cumin powder
1/2 tsp chili powder ( optional)
1.5 cups shredded Colby Jack cheese (or Mexican blend)
Garnish
1 cup sour cream (I use Greek Yogurt as a healthier alternative)
Guacamole
Green onions
Method:
Heat Ninja Foodie on Sear function
Add oil
When hot, add in the onion and garlic
Stir fry for a minute
Add in the green peppers and red peppers, stir for another minute
Switch off Foodi
Add in the beans, chicken, corn, salsa, cumin and chili powder. Mix well
Sprinkle the cheese on the top of the mix
Close the lid of the Foodi and turn on the Bake function. Bake at 350F for 5 mins or until cheese is melted
When done, turn off the Foodi
Serve garnished with onions, sour cream and guacamole. Optionally, serve with a side of Mexican rice or in a tortilla as a burrito.
This Chorizo Burrito Bowl while packed with Mexican flavors, is a healthier than any version you’ll get in a restaurant but still just as delicious! Not only is it healthy, it’s a quick, delicious meal. Home-made chorizo takes center-stage on a bed of Cilantro Lime Rice along with tomato salsa, corn, black beans, lettuce, and so creamy guacamole. Pack it for lunch or get a quick dinner on the table, it’s a guaranteed favorite.
1/4 cup – Queso Fresco cheese (I avoid it to keep it healthier, but use it for the kids)
1/4 cup – Greek yogurt (replacing sour cream with yogurt makes it healthy while providing the same, delicious, creamy flavor
1/4 cup – Pico de Gallo
1/4 cup – Corn Salsa
1/4 cup – Guacamole
In a rush: You can make it easier by using store bought chorizo (I have used V&V Supremo brand when in a pinch), and canned black beans – just rinse it out before using.
Method:
In a bowl, combine cabbage, lime juice, and salt . Combine and refrigerate until needed
To serve:
Layer each serving bowl with half a cup of the Cilantro Lime rice. Top rice with black beans, Chorizo, lettuce, cheese, yogurt, pico de gallo, corn salsa and guacamole, spreading it evenly across the bowls.
Enjoy!
Note:
If using store-bought chorizo, it will need to be cooked
Heat a pan and add 1 tbsp of oil
When oil is hot, add 1/2 a chopped onion. Fry onion for 2-3 minutes and then add chorizo.
Sauté for 7-8 minutes on a medium flame, stirring and breaking the meat up with the spatula, until it is fully cooked through and meat turns from bright red to reddish-brown
Tender, delicious black beans for just about any dish that calls for black beans like burritos, or a Burrito Bowl or Santa Fe Chicken. Yes, takes longer than beans from a can but so much better for you. Black Beans are full of protein, fiber, folate and magnesium. Cook up a pot and have them ready for soups, salads or just a side.
Servings: 6 cups when cooked
Time – if using a Pressure Cooker: 5 minutes prep time + 25 minutes cook time; if using stove top: 5 mins prep time + 1 hour cook time
Ingredients:
1 lb dried black beans
1 small red onion, diced fine
4 cloves garlic
2 bay leaves
1 tbsp olive oil
1 tbsp cumin powder
1/2 tsp red chili powder
1 tbsp lime juice
2 tbsp finely chopped cilantro
6 cups water
Method:
Rinse the black beans twice, throwing out the water after each rinse
Pressure Cooker Method:
Next day, in a pressure cooker, heat the olive oil
When oil is hot, add in the bay leaves. Once leaves splutter, add in the garlic and onions. Stir for a minute and then add in the cumin powder, chili powder, beans along with the water
Close the pressure cooker and close steam valve. Set to high pressure for 25 minutes total. Then allow the pot to naturally release steam for 15 minutes
To serve, stir in the lime juice and cilantro. Add salt and/or adjust seasonings, if needed
Stove Top Method:
In a large pan, heat the olive oil
When oil is hot, add in the bay leaves. Once leaves splutter, add in the garlic and onions. Stir for a minute and then add in the cumin powder, chili powder, beans along with the water
Bring the water to a boil then cover with a lid. Reduce the heat to low. Set timer for an hour and let the beans simmer. After an hour, check the beans – they should be plump and easy to press through with a fork. If still tough, continue to simmer in 5 minute increments until soft. If needed, add a little water.
When done, turn off the stove.
To serve, stir in the lime juice and cilantro. Add salt and/or adjust seasonings, if needed
Beans can be used right away in various recipes like a burrito bowl or Santa Fe Chicken stored in fridge for 5 days or in a well-sealed container in the freezer
30 mins to get dinner on the table before ravenous kids burst through the door! All I had on hand was some pork in the fridge. A quick combination of pork, and beans in a tomato broth with some spices that are often used in Mexican recipes, resulted in a hearty stew that we enjoyed on a cold winter’s day.
Serves: 4 Total time: 25 minutes
Ingredients:
1 tbsp olive oil
1 lb Bone-in pork loin – cut into small cubes while keeping the bone – adds flavor. Alternatively, 1 lb pork shoulder, small cubes
1 small red onion, finely diced
4 cloves garlic, finely minced
1/2 jalapeno, finely diced
1/2 tsp red chili powder
1 tsp smoked paprika powder
1 tbsp cumin powder
1/2 tsp Mexican oregano powder
1/2 tsp black pepper powder
1 15.5oz can white beans ( I had cannellini, you can use white kidney or pinto beans)
1 14.5 oz can fire roasted diced tomatoes
1 cup chicken broth
Juice from 1 lime
Salt, if desired
1/4 cup cilantro, chopped
Method:
In Pressure cooker:
Put oil in pressure cooker
When hot, add the onions, garlic and jalapeno. Fry for 2-3 minutes until onion is soft and translucent, stirring occasionally
Add the chii powder, cumin powder, smoked paprika, oregano and black pepper powders and stir for a minute
Add in the pork pieces and stir to coat the meat with the spices
Add in the diced tomatoes, beans and broth
Close pressure cooker and pressure cook for 15 minutes
When done, let pressure off, remove kid and garnish with the lime juice and cilantro
While living in Toronto, I was spoilt with some really good Thai restaurants. However, there isn’t a Thai restaurant near us that truly wows us. So, trial and error has got us to a point where we no longer need to drive out to a good Thai restaurant, chez nous kitchen beckons instead! And the best part of most Thai curries is they are easy to whip up allowing me to get a delicious, filling and health dinner to the table in 30 mins or less. And you can make a one-pot meal by adding vegetables to the curry.
Servings: 4 Time: 20 minutes
Ingredients
4 (6 oz) skinless tilapia fillets ( or vegetables like tofu, baby corn, bamboo shoots, if you want to keep this vegetarian)
1 tbsp olive oil
1/2 red onion, small, diced fine
1 tbsp ginger, minced
4 tbsp red curry paste ( or to taste, depending on the paste you use and spice level)
1 15 oz can of unsweetened coconut milk
1 tbsp fish sauce (if vegetarian, omit fish sauce and brown sugar, and add salt to taste)
1 tbsp dark brown sugar
1 cup carrots cut into matchsticks
1/2 cup green peas
1/4 cup cilantro or basil leaves, for garnish
Method:
In a large skillet, heat the olive oil. When oil is hot, add in the onions and ginger. Sauté for 2-3 minutes until the onions turn soft and translucent.
Add in the red curry paste and stir for 1-2 minutes
Add half of the coconut milk to the pan and stir in, until the coconut milk and the curry paste are well blended. When the milk starts to bubble, add in the remaining coconut milk. Stir well for a minute
Add in the fish sauce and brown sugar and bring the curry to a boil
Lower the flame, add in the carrots and green peas
Stir and then add in the fish
Cover and let cook on medium-low flame for 5-6 minutes until the fish is cooked through
Remove from flame and garnish with the cilantro/basil leaves
This Indian winter vegetable is long, flat with a slight curve. The pods are smooth, thick, and pale green, tapering at both ends. Each pod contains 2-4 seeds that are slightly flat. This vegetable is widely used in Indian cuisine and also in Chinese cooking. According to the site tarladalal.com, it is a low calorie, low carb vegetable that is good for weight loss. It’s packed with nutrients and can provide your daily intake of calcium, iron and magnesium. In the US, this bean can be found in the frozen section of an Indian grocery store. Here’s a recipe that is simple and flavorful and can be made in a jiffy when you want a side of greens for your meal.
1 tbsp tamarind pulp (take a small ball of tamarind, add a few spoons of water to it, microwave for 1 minute and when warm to touch, squeeze out the pulp)
1/4 cup shredded coconut (normal, not sweetened, can use frozen)
Finger-licking Butter Chicken! The quintessential Indian dish that is found in New York, London, Sydney and often times, the smallest of Indian restaurants in points in between. Originating in the Indian sub-continent, it is a delicious, creamy, tomato-based curry with spice-infused chicken bites and can be as mild or spicy as you like. It’s simple and finger-licking good! Make it once and you’ll be making it again and again!
Marination:
1 lb boneless chicken cut into bite size cubes
3/4 tsp oil
2 tsp ginger garlic paste
1/2 tsp garam masala
1 tsp cumin powder
1 tsp coriander powder
1/2 cup Greek Yogurt
1/2 tsp red chili powder
1/2 tsp red sweet paprika powder
1 tbsp lemon juice
1/4 tsp salt
Gravy:
1/4 cup butter
3 green cardamoms
4 cloves
1 cup red onion finely diced
2 tbsp ginger – finely minced
2 tbsp garlic – finely minced
15 oz can tomato sauce
20 cashew nuts
1/4 cup milk
1 tsp red chili powder
3/4 tsp garam masala powder
1/2 tsp coriander powder
1/4 tbsp sugar
1 tbsp kasuri methi (dried fenugreek leaves)
salt, to taste
2 tbsp whipping cream
Method:
Preparing the chicken:
Marinate the chicken: In a Ziploc bag (or a container), mix all the ingredients mentioned under marination above with the exception of the chicken. When it is mixed well, add in the chicken and massage the marinate into the chicken. Cover/Close Ziploc and keep overnight in the fridge or 48 hours. The longer it rests, the more tender. I often buy chicken, cut it up and divide it between different marinades and freeze it for when needed
Grill or cook the chicken:
In Air Fryer / Ninja Foodi: Pre-heat the Foodi with the basket for 5 minutes. Spray the basket with a little oil. Add the chicken pieces in a single layer making sure they aren’t touching. Spray the top of the chicken pieces with oil. Air Crisp on high for 360°F for 5 minutes. Then flip the pieces and continue on Air Crisp for another 3-5 minutes until the internal temperature is at least 165°F. Remove and place on a cooling rack/plate
On Stove Top: Add 1 tsp butter to a pan. When heated, add the chicken and marinade to the pan. Don’t overcrowd the chicken. Fry on high flame until liquid evaporates and chicken is cooked through.
Prepare the gravy:
In a blender, make a smooth puree of the cashews and tomato paste and set aside
In a wide pan, heat the butter. Sauté the cardamom and clove till the cloves splutter and cardamom plumps up, and add in the onions
Sauté the onions for 2-3 minutes and add in the ginger and garlic. Continue to sauté the mix for 2-3 minutes on medium flame. The onions should be soft and translucent
Now add in the cashew, tomato puree and stir. Fry this mix on medium-low flame for 2-3 minutes
Add the chili powder, coriander powder, salt and sugar and continue to fry this mix until the puree starts to thicken and leave the sides of the vessel
Add the milk and continue to stir to form a gravy (Add more milk if a thinner consistency is desired)
Simmer for 4-5 minutes on a low flame
Add in the chicken and simmer for 4-5 minutes
Add in the garam masala and the kasuri methi and stir. Simmer for 2-3 minutes
Switch off the stove and pour in the cream and let it rest. No need to stir it in
Garnish with coriander leaves and serve hot with naan or rice
Comfort food! We’re in quarantine unfortunately, and my mind immediately went to the foods my mom would make to help our bodies heal and to boost immunity. Kichdi, a rice and lentil porridge, is one of those foods. A simple and quick one-pot dish that nourishes your body. Protein-packed, it’s a soothing Indian meal that’s perfect for someone under the weather (and even when you’re not)! I make this in the Ninja Foodi but it can be made in the Instant Pot or a Pressure Cooker.
Prep Time: 10 minutes Cook Time: 25 minutes Total time: 40 mins
Servings: 4
Ingredients:
1 tbsp Ghee (or oil, for a vegan recipe)
1/2 cup Basmati rice
1/2 cup small whole green moong dal (or small yellow moong dal lentils)
1/4 teaspoon turmeric powder
1 Bay leaf
1/2 teaspoon cumin seeds
1/2 teaspoon mustard seeds
1 teaspoon finely chopped ginger
1 medium green chili finely chopped
1 large tomato diced
Salt to taste
Method:
Soak the basmati rice and moong dal in cold water for 15-30 minutes. Drain, rinse and set aside.
Set the Ninja Foodi/ Instant Pot to sear option
Add the 1 tbsp Ghee and when hot, add the bay leaf, cumin seeds, mustard seeds, ginger and green chili
Stir for a minute, and then add the diced tomato
Stir for a minute and add the rice and dal along with 3 cups of water, turmeric powder and salt
Secure the lid, select the pressure cook option, close the pressure valve and cook for 15 minutes at high pressure (12 minutes if using yellow moong lentils instead of the small whole green ones)
When done, slow release for 20 minutes and open lid to release pressure
I made these Wonton Pork Taco recipes for a party and the guests loved it! Great appetizer for a party or even an option for dinner Give it a shot and tell me what you think. The steps are quick and will be worth it!
Prep time: 20 minutes. Cook time: 20 minutes
Servings :4
Ingredients
For the pork
1 lb ground pork
2 tbsp Hoisin sauce
1 tbsp Sesame oil
1 tbsp Sriracha sauce (or to taste)
1 tbsp Soya sauce
4 cloves garlic, finely minced
1 tsp minced fresh ginger
1 scallion finely chopped
For the pickled vegetables
1/2 cup red cabbage
1/2 cup green cabbage
1/2 cup fine cut carrot sticks
1/4 cup radishes cut fine (optional)
4 green onions, thinly sliced
1 tbsp sesame oil
1/2 cup rice vinegar
1 jalapeno diced, deserved if you don’t like it spicy
1/4 cup granulated sugar
1/4 tsp salt
Remaining ingredients:
12 Wonton wrappers or taco shells
Sweet chili sauce, to serve
3 tbsp Chopped cilantro, to serve
Sesame seeds, to serve
Method
Make the pickled vegetables:
In a medium glass bowl, mix well the 1 tbsp of sesame oil, as well as the rice vinegar, granulated sugar and salt. Stir well until the sugar is dissolved completely
Place the red and green cabbage, carrot sticks, radishes, and jalapeno in the above mixture and stir well. While you can eat this right away, it tastes best if you let it chill for atleast an hour
Make the pork:
Place a shallow pan on the stove and heat the 1 tbsp of sesame oil over medium-high heat
Add the green onion and the ginger, garlic. Cook, stirring for 1 minute. Add pork and cook, breaking up with a fork, until no longer pink, 8-10 minutes.
Stir in the Hoisin sauce, soya sauce, and Sriracha sauce. Fry another 2 minutes
Remove from heat and let cool for 5 minutes
For the taco shells:
Pre- heat oven to 375F
Spray wonton wrappers with cooking spray, then drape over two of the metal slats of a steamer rack trivet. This creates a flat bottom and they stay open better to fill
Alternatively, use a cupcake tine and make wonton cups
Bake for 8-10 minutes. Watch closely so they don’t burn
Assembly:
Add pork mixture to the wonton shells, top with pickled vegetables, drizzle with sweet chili sauce, sprinkle with cilantro and sesame seeds. Enjoy!
Curry and rice are Goan meal staples. Every summer when we visited our grandparents in Goa, we feasted on fresh fish. My parents would make a trip to the marketplace where you had a large, wet, slushy section devoted to fish. That’s where you heard fisherwomen loudly arguing with those who tried to haggle to a price that was deemed too ridiculous! These fisherwomen, all dressed so colorfully, sat with baskets overflowing with fish of all types – Shrimp/Prawns, Pomfrets, Mackerels, Kingfish, Shark. You had to know how to haggle or else, they smelled you were a novice and you’d end up paying three times the price. When my parents brought the fish home, we’d all help with cleaning the fish, and deveining those prawns. Then would come the grinding of the masala, on this large stone – that toned up your arm muscles by the end of the summer! Rechad-filled pomfrets, rava-prawns, ambot tik with shark, and prawn curry, the very thought makes me drool. But time is a critical asset these days, and thanks to shortcuts like coconut milk cans and food processors, I can whip up the same curries and then take my time enjoying the food and reminiscing about those holidays!
Servings: 4 people Prep time: 30 mins Cook time: 20 mins
Ingredients:
20 medium-sized Prawns or Shrimp – cleaned and deveined
For Masala
1.5 cup unsweetened coconut milk
8-10 Kashmiri red chilis
6 Garlic cloves
3 tsp whole Coriander powder
2 tsp Cumin powder
1 Tamarind (marble-sized ball)
1/2 tsp Turmeric powder
Other ingredients:
2 tablespoons Coconut oil
1 medium Onion chopped finely
1 medium Tomato chopped finely
1 green chili – slit
Salt (to taste)
Method:
Apply ½ tsp salt to shrimp and leave aside for about 15 minutes
Grind all ingredients under “For Masala” using sufficient water to form a smooth paste. Keep aside
In a pan heat, heat coconut oil. Add onions. Fry till onions are a light golden brown and add tomatoes. Cook for 6-8 minutes till the tomatoes are soft
Add the ground Masala, green chili and salt to the pan. Fry for 3-4 minutes
Reduce the flame and simmer for 8-10 minutes
Add the shrimp and cook for 4-5 minutes (cooking times will change based on the size of shrimp used – large shrimp for 7-8 minutes, medium shrimp for 4-5 minutes and small shrimp for 2-3 minutes)
Nail Chinese BBQ pork with this recipe! My kids love going to a local Chinese dive because of the barbeque pork fried rice. They could eat that for lunch and then again for dinner! The restaurant isn’t close by and during Covid, we missed it much too much and had to try and replicate the recipe at home. The fried rice was easy, the bbq pork, not as much. A couple of recipe improvisations later, and we no longer need to step out for this bbq pork. Best of all, I know the cut and quality of the meat used and I don’t need to add red color.
2 lbs boneless pork shoulder (the more fat, the tastier it will be)
2 tbsp finely minced garlic
1 tbsp salt
4 tbsp brown sugar
2 tbsp soya sauce
2 tbsp oyster sauce
1 tbsp hoisin sauce
1 tbsp Shaoxing wine
2 tbsp red wine
1 cube red fermented bean curd
2 tsp five spice powder
2 tbsp honey
1/2 tsp sesame oil
5 tsp water
Method:
Cut the pork into long strips or chunks about 2 inches thick. Aim for uniform slices so they cook uniformly. Don’t trim any excess fat, as it will add flavor
Sprinkle the salt over the slices. Then poke each side of the long strips with a fork to help it absorb the marinade, when applied
In a bowl, make the marinade – combine the garlic, oyster sauce, soya sauce, hoisin sauce, red wine, Shaoxing wine, garlic, five spice powder and the bean curd. Mix well till smooth
Reserve about 2 tablespoons of the marinade. Cover and set aside in fridge
In a large ziploc bag, pour in the remaining marinade. Add the pork to the bag and massage the pork allowing the marinade to cover the pork well. Close the bag and refrigerate overnight, or 8-10 hours
When ready to cook, remove the pork from the fridge and let it rest on countertop while pre-heating the oven to the bake setting at 425F, with a rack positioned in the upper third of the oven.
Line an oven-proof bowl with an aluminum foil. Place 3 tablespoons of water between the foil and the bottom of the bowl to create some steam. Place the pork slices in a single row on the foil.
Place the bowl in the oven and set timer for 15 minutes
While pork is in oven, combine the honey with 2 tbsp of water
Cook for 15 minutes and then lather both sides with the pork marinade
Cook for another 15 minutes and lather both sides with pork marinade again
Cook for 10 minutes and lather both sides with the honey-water mix
Now turn up the over to 450F, and cook for another 5 minutes
Remove from oven and baste with the 2 tablespoons of marinade that had been set aside
Let it rest for 5 minutes – then cut and enjoy
Note: By now, the pork has cooked for 50 minutes total. It should be cooked through and caramelized on top. If it’s not caramelized to your liking, an option is to turn on the broiler for a couple minutes to crisp the outside and add some color. Please don’t walk away during this as it can sear quickly. You can also use a meat thermometer to check if the internal temperature of the pork has ready 160F
Serving suggestions:
This big batch of pork can be used right away or frozen. Use it for barbeque pork fried rice, as an appetizer by itself, or in Vietnamese Banh Mi sandwiches which my high-schooler LOVED enough to take to school two days in a row!
This spicy, gochujang tofu recipe will have you craving for more. Not only is it flavorful, combine that with brown rice, steamed vegetables like broccoli or bok choy, and you have a healthy, vegan meal on your table in under 45 minutes.
Why Tofu? Tofu has a range of benefits – it’s a great add to an anti-inflammatory diet while providing a good amount of protein. But it can be bland. Adding some soya sauce and gochujang certainly ups the game! What’s gochujang? Gochujang is a fundamental ingredient in Korean cooking. It’s a thick and spicy-sweet dark red paste made from red chili peppers, and fermented soybeans. If you don’t have it handy, a little Thai chili paste or sriracha combined with a dash of soya sauce and sugar will serve as a substitute.
2 tbsp gochujang (or 1.5 tbsp sriracha, mixed with 1 tbsp ketchup, 1/2 tsp soya sauce and 1/2 tsp sugar)
1 tsp brown sugar
1/2 cup water
2 green onions (chopped)
2 cloves garlic (finely minced)
1 tsp ginger (finely minced)
2 tbsp Oil (plus spray if baking) – sesame, vegetable or olive oil
Optional: 1-2 tsp toasted sesame seeds
Instructions:
Drain water from the package of tofu. Press down gently on the tofu to remove as much water as possible
Slice the block of tofu into 1/2 inch planks and then into bite-sized cubes
In a mixing bowl, combine1 tbsp of the soya sauce and the tablespoon of cornstarch. Add in the tofu cubes. Gently mix to combine.
You can bake the tofu in the air-fryer or cook it on a stove top
Air-fryer option: I used an air-fryer, a Ninja Foodi. Set the Foodi on air-crisp option to 400F. Heat the cooking basket for 3 minutes. Spray with oil to coat the bottom of dish and place tofu cubes in it. Spray the top of the tofu lightly. Air-fry the tofu for about 12 minutes until crispy.
Stove-top option: Heat 2 tbsp of oil (sesame or olive or vegetable oil) in a pan, and when hot, add the tofu and cook over medium-high heat until golden brown
While the tofu is baking in the air-fryer, or stove, mix the soya sauce, gochujang paste, brown sugar and water in a bowl until combined
Heat the oil in a frying pan. Add the garlic and the whites of the chopped green onion
Saute on medium heat for 2 minutes
Add the sauce and cook for 2 minutes
Add the cooked tofu to the sauce and stir gently. Cook for 2 minutes
Remove from stove top
Best served right away, garnished with the chopped green onions
Tastes great served on a bed of rice and with a side of steamed broccoli or bok choy
No Indian meal is complete without the fragrant Basmati rice. And, in our house, no birthday or celebration was complete without my mom’s flavorful pea pulav – an aromatic dish made with long-grained Basmati rice and green peas, and flavored with cardamoms, cloves, and other spices. It was inviting enough to eat on its own, no sides needed. When I make it for a Sunday-special lunch, I will often mix in other vegetables and have a delicious meal on-hand in no time at all.
Interestingly, each of the spices have a health benefit – so why not take a couple of minutes and add flavor and nutritional benefits to plain ol’rice:
Bay leaves are a rich source of vitamins A, and C, iron, potassium, calcium, and magnesium, promoting general health
Cloves are rich in antioxidants and minerals and known to strengthen the immune system, reduce inflammation, and aid in digestion
Thanks to it’s anti-inflammatory properties, peppercorn improves circulation, reduces joint pain and also helps combat high blood pressure and cardiovascular diseases
Cardamom helps improve oral health and may have antimicrobial, antioxidant, and anti-inflammatory properties
Turmeric is said to ease joint pain, stiffness, and inflammation
Servings: 4
Ingredients:
1 cup Basmati Rice
4 tbsp Ghee (or vegetable or olive oil)
1 Bay leaf
8 cloves
8 Peppercorns
1 inch Cinnamon stick
4 Cardamom – crushed
1 large Onion (chopped finely)
1/2 tsp turmeric powder
1/2 cup Green Peas
1/2 cup Carrots (diced) – optional
1 tsp Salt
2 cups Broth ( veg, chicken or beef) – For perfectly separated rice – use the same cup to measure the rice and the broth
Instructions:
Wash the rice very gently and drain all water. Rinse twice more so that the water is clear (this removes the starch from the rice). Drain water completely each time
Place a large pan on the stove on medium heat
Add the ghee to the pan
Once the ghee is hot, add the Bay leaf. (Note: If the bay leaf sizzles immediately, you know the oil is hot. If not, wait a few more seconds, until you start to see the leaf sizzle)
Add the rest of the whole spices to the ghee – cloves, pepper corn, cinnamon and cardamom
Fry for 30 seconds
Add the onions and fry for 2-3 minutes until the onions are translucent
Add the turmeric powder and stir for another minute
Add the rice to the pan, and fry for 1-2 minutes
Add the stock, salt, and stir once, very gently
Let the stock come to a boil then reduce the heat to low, and cover the pan with a tight fitting lid
Let the rice cook – will take about 10-12 minutes
After 10-12 minutes, check rice. If all the water is evaporated, turn off the flame. Keep the container covered – allowing it to sit covered for 5 minutes
Fluff the rice and vegetables with a fork and serve
Chorizo brings back memories of Goa. Goa was where we spent our summer holidays with our grandparents and uncle. The best part was the food….farm-fresh eggs, chicken, and lots and lots of pork. The pork was always one of the piggies we played with that made its way to the table. At that time, we didn’t realize why one or the other would go missing. I still remember the day when my sister learnt that her favorite pig Paklo was on the table….she stopped eating pork for a very, very long time. Eventually, years later, it was the taste of delicious Goan sausages which are very close to the Mexican Chorizo that lured her back to eating pork. It has been hard to make or buy Goan sausage and so, Mexican Chorizo is a great alternative. Are Goan pork sausages the same as Mexican Chorizo? They both use almost similar spices but they are not the same. Goan sausages, also known as choriz, are similar to the Portuguese chourico (Goa was once ruled by the Portuguese). It is cured like the chourico but unlike chourico, it still needs to be cooked before eaten. The Mexican chorizo is fresh and also needs to be cooked.
I hesitate to buy store-made sausages or chorizo after I read that it often includes mechanically separated meat (check the ingredients…you’d be surprised some of the top brands do that with hot dogs and sausages) and nitrates, which are supposedly cancer causing. Now that I figured out how to make this at home, it’s a easy way to have delicious chorizo on hand for tacos, burritos, with eggs or just about anything!
1 lb ground pork (preferably a 70/30 meat/fat content)
Method:
In a small bowl, mix together all the dry ingredients
In a large glass or metal bowl, ad the ground pork, vinegar, garlic and the dry ingredients. Mix until the ingredients are all well combined
Can be used right away or stored refrigerated in an air-tight container for 3-4 days for later use or freeze in a sealed freezer bag for up to 6 months
Cooking Chorizo: To use right away:
Heat a pan and add a tbsp of oil
When oil is hot, add 1/2 a chopped onion. Fry onion for 2-3 minutes and then add chorizo.
Sauté for 7-8 minutes on a medium flame, stirring and breaking the meat up with the spatula, until it is fully cooked through and meat turns from bright red to reddish-brown